At the recommendation of a friend, I signed up for a five day ad challenge. This particular challenge has six pre-recorded videos, some “homework” (I use the quotation marks because it’s really up to you if you do it or not, right?), and six live Q&A sessions. As with any free instruction, I was prepared to hear the sales pitch for the bigger (i.e. “better”) course that they offer for a price.
This recommendation came after I noted that I was completely overwhelmed by idea of marketing my self-published book. There are SO MANY possibilities out there. How does one even know where to start? This specific course walked through how to set up ads through that large corporation that we wish we didn’t have to use – but how can you sell your books without it? [sigh] Following are the things I learned. In the next post, I will share some more info, how to read the stats, and the results I saw (I took this challenge in July).
First, the corporation has their own series of videos/webinars/etc. about their ads. You can, of course, review those instead of searching out another course. This course specifically touts the access to the speaker and other writers through their private Facebook group (though they shut off the ability to post in said group between the times they offer the challenge – so not sure it’s really worth it).
Please note that you will need a debit or credit card to put on file with said corporation to pay for the ads. If you have an @m@zon account already, you can use the one already on file – but you do need to link it to this ad platform account before you launch your first ad.
As someone who is just starting out and has one book out there so far, I followed the speaker’s recommendation first to focus on ‘Sponsored Product Auto‘ ads, rather than the ‘Sponsored Brands’ ads and ‘Lockscreen ads.’
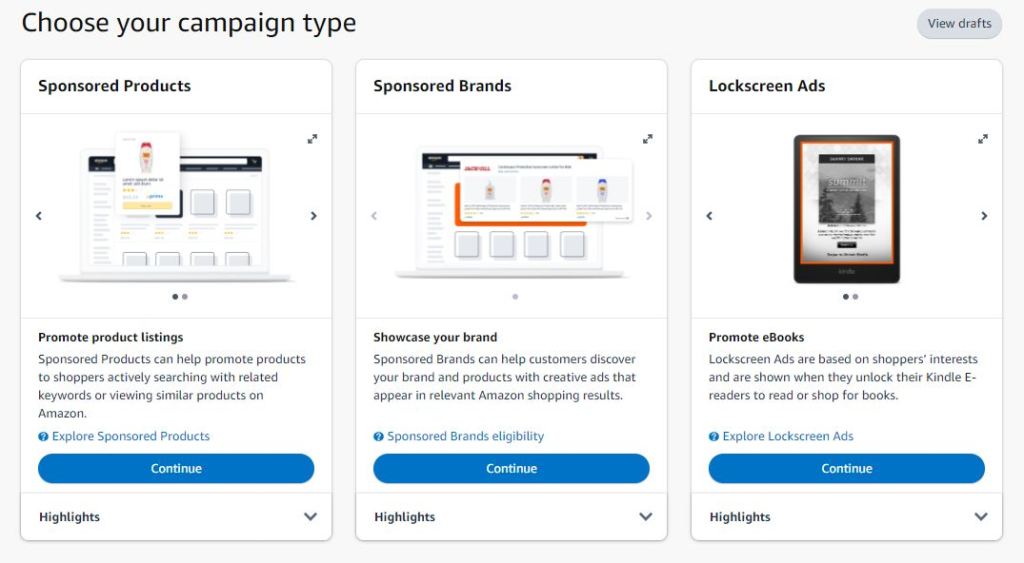
In the advertising platform, click ‘continue’ at the bottom of the Sponsored Products box. On the next page, there are several boxes, each focused on different pieces of your ad. The speaker recommended the following:
- Ad Format: Choose Standard Ad
Ad Group Settings: You’ll want to create a naming system to help you track. The speaker recommended SPA 1 (i.e. the first sponsored products ad)
Products: Click “add” for the book you wish to advertise. (It doesn’t matter if you choose the eBook or paperback format for this. If someone clicks on the add, they will see the options you have available for your book.)
Targeting: Choose Automatic Targeting (this is where you’ll want to make sure your metadata is in tip-top shape – that you have chosen the right categories*)
Automatic Targeting: Speaker recommended a default bid of $0.34 for a standalone book and $0.39 for the first in a series. (Double check your decimal point is in the right place!) They never really explained why they chose these price points. I assumed the first in the series price is a bit higher since the assumption is one click/sale will (hopefully) result in them buying more than one of the books in the series.
Negative Keyword** Targeting: Speaker recommended to leave alone.
Negative Product Targeting: Speaker recommended to leave alone.
Campaign Bidding Strategy: Speaker recommended “Dynamic Bids – Down Only” (meaning if the cost is cheaper than your bid, you will pay the lower price; if you choose ‘up and down,’ then they can charge more than your bid, so you would run through your daily budget quicker than expected).
Settings: Recommended, again, to come up with your own naming system for tracking various adds. Speaker offered creating an acronym for your book’s title and following it up with SPA and either 34 or 39 depending on your default bid. You will want to be reasonable in how long the ad can run and what you can afford as a daily budget (double check that end date – it auto-fills for several months later). Until you start seeing profits from ad clicks, you will want to assume that you won’t make this money back (i.e. don’t put ten bucks as your budget if you can’t afford to lose that money). Speaker recommended $5 a day, but, again, only price out what you can afford to lose. - If you don’t have a debit or credit card on file, you can only save your ad as a draft. If you have one on file, you can launch – but make sure you double check everything before you hit launch!
On the second day of the challenge, the speaker told us about ‘Sponsored Product Category’ ads. For this, you will follow all of the steps above – except this time, instead of choosing Automatic under Targeting, choose Manual (before you run such an ad, first make sure you have proper categories* for your book).
- Manual Targeting: In the first box that appears when you choose Manual, select Product Targeting.
Below is the second box that will appear when choosing Manual:
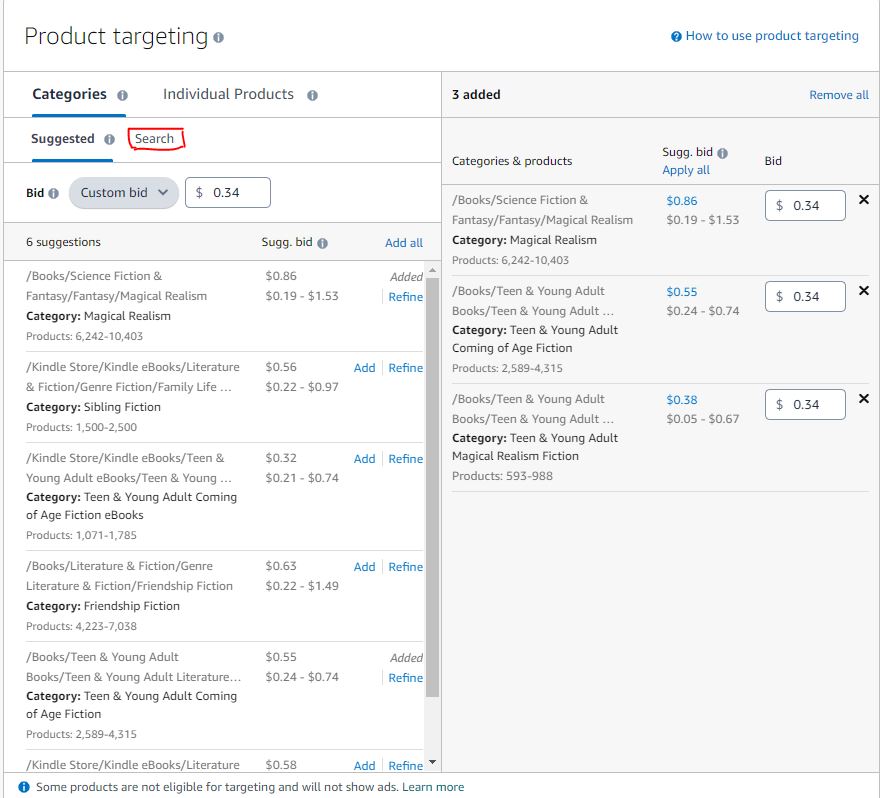
- Bid: Next to “bid” on the image above, there is a drop down menu with three options: suggested bid, custom bid, and default bid. The speaker recommends changing both the custom and default bid to $0.34 or $0.39 (when you select these from the dropdown menu, a textbox will appear to the right of the menu for you to enter the bid).
Suggested: Above bid, there are two options. Suggested is the default. Based on the book you chose in the Product section, the platform will generate suggested categories for your ad. You can scroll through these and see if there are ones that you feel fit best.
Search: You can also click search and type in specific categories (one at a time).
Note: I had gone through and selected categories and took the screenshot before the speaker recommended using one category per ad (ending up with three individual ads for three individual categories).
Again (this is me saying this), make sure you really consider how much you can spend on these ads. Maybe you can only run one at a time. That’s fine. Maybe you can only afford a dollar a day for a week. That’s fine. Don’t overspend in the hopes that the profits will come. We all, of course, hope they will come, but we need to make sure we aren’t spending more than we can afford to.
The speaker did note that often ads won’t end up using the entire allotment of money each day. Something newer to this platform is that those unspent dollars will roll over. So let’s say you put five bucks a day. You might only spend three bucks the first day. The other two bucks will roll over, and the next day you might spend seven. Also – you only get charged for clicks. You may have a number of impressions throughout the ad cycle and no clicks, so none of your budget is spent.
In the third video, the speaker broke down ‘Sponsored Product Keyword Ads.’ As with the last ad, we’ll follow most of the steps for the initial auto ad. When we get to the step on Targeting, again choose Manual.
- Manual Targeting: In the first box that appears when you choose Manual, select Keyword Targeting.
Below is the box that will appear when choosing Manual/Keyword:

As with the last manual targeting ad, you’ll want to change the customized and default bid to $0.34/$0.39. Next to ‘filter by,’ you will want to unlick phrase and exact, leaving broad checked. (As you get more experience and fine tune your keywords**, you can use the other two.)
If you selected your book under products, there will be a list of suggested keywords** – the ones that showed for mine weren’t super relevant to the story (my book is not a romance or free, there is no time travel, and it came out in 2023 not 2022…). The speaker recommends coming up with your own list of keywords** (about 100-150). I would recommend creating a list in a word document. Separate phrases by hitting enter – not a using a comma. Then, when you feel you have a good list, you can click “Enter list’ and copy/paste your keywords**. The speaker recommends that if you end up editing the keyword** list in your ad to only change two to four keywords** at a time so that you can get a clear idea what keywords are having them most impact.
Note: If you save your ad as a draft, double check the check boxes – they kept refilling when I would go back in to edit the ad.
*Categories: When it comes to choosing categories and keywords** for your book, it might feel like an easy selection for some. For others, we might overthink it (it’s me – I overthink it). We only get three (until recently, we only had two). So we want to make sure we are choosing the right ones so that our audience can find us. (The speaker noted that previous practice was to look at all the categories possible for your book and choose the ones with fewest products in the hopes that reaching number one in that category would be easier – but it seems that number one spot in a small category doesn’t really translate to more sales as fewer people are probably going to be directly searching for it.)
If you’re unsure what categories you should pick, the speaker recommended looking up books that would have a similar audience as yours, and using Book Link – BkLnk. Grab the AISN (or ten digit ISBN) and visit the Book Link website: https://www.bklnk.com/categories_2022.php (this is a direct link – you can also go to bklink.com and select Author Tools from the menu, then CATFINDER). There is a search box that you can paste the AISN/ISBN into, and it will populate the categories for that book. This can be used as a guide for picking your own categories.
**Keywords: In the video, the speaker recommended coming up with 100-150 keywords for your book. You will want to start with your “KDP 7” – i.e. the seven keywords that you input as metadata for your book. Open an incognito window in your web browser (so that you don’t mess with your @m@zon algorithm), navigate to @m@zon, select Kindle or Books to narrow the search, and type in your first keyword. See if the books that come up are similar to yours. If they are, then on to the next. If not, rework the keyword until you find books that would have the same audience. You can also start typing phrases and see what is auto-filled. For example, if you wrote a YA book, start typing Young Adult and see what pops up in the suggestions. If any of the autofill options might fit, click on them.
Note: @m@zon doesn’t accept special characters or phrases that are more than fifty characters as keywords.
The speaker also spoke about a resource called Also Bought Downloader by Kindlətrends – you can download/install this on your browser. Then, on your page, if there are “customers also bought” (scroll way down the page), there will now be a little button next to it:
Click on that, and the plugin will scroll through all those books and download the metadata as a TXT file. With a little cleanup (which you can do by opening it with Excel, or the spreadsheet program of your choice), you will have a list of titles and authors that might have the same audience as your book – which can be used as keyword searches.
Through this process, you may find that your originally selected “KDP 7” aren’t a great match – so don’t be afraid to change those if needed.
Next week, I’ll go over what I learned in the remaining videos (including writing ad copy).
